 Okay, so my previous MAME cabinet isn't as small
as I wished (and especially not as lightweight as I thought it would be).
And I also found some pictures of those old Coleco tabletop arcade
machines. So when you mix the two together in my mind, it doesn't take too
long for me to come up with a new idea: a micro-sized MAME arcade cabinet!
Okay, so my previous MAME cabinet isn't as small
as I wished (and especially not as lightweight as I thought it would be).
And I also found some pictures of those old Coleco tabletop arcade
machines. So when you mix the two together in my mind, it doesn't take too
long for me to come up with a new idea: a micro-sized MAME arcade cabinet!
I call it Micro-MAME since there's already quite a number of people calling their cabinets "Mini-MAME" even though some of them are quite large (even bigger than my previous one).
Computer
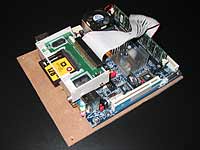 To keep the cabinet small, you have to start with a really small computer.
What better use can you find for those nice VIA Epia motherboards? (Okay,
plenty of uses). The VIA C3 933MHz
isn't the fastest of CPUs, but then again I only want to run 1970-1985
games with this cabinet. And since the CPU and the chipset run really
cool, I shouldn't have any problem with the whole thing running inside
such a small cabinet.
To keep the cabinet small, you have to start with a really small computer.
What better use can you find for those nice VIA Epia motherboards? (Okay,
plenty of uses). The VIA C3 933MHz
isn't the fastest of CPUs, but then again I only want to run 1970-1985
games with this cabinet. And since the CPU and the chipset run really
cool, I shouldn't have any problem with the whole thing running inside
such a small cabinet.
The photo here shows the motherboard with the CompactFlash IDE adapter mounted to the LPT port (with the help of the port's screws). I had to split the wires of the IDE cable so I could more easily twist it to connect to the adapter. Of course, I could get rid of the adapter and the cable if I used an IDE Flash Module instead, but they're a lot more expensive than CompactFlash cards.
Monitor
 Since I need to keep things small, I'm using a Sharp 6.4" TFT LCD
monitor. I had to make it rotating (to switch between horizontal and
vertical games) because with a screen this small, every bit of screen
space counts (horizontal games displayed with a vertical setup are way
too small).
Since I need to keep things small, I'm using a Sharp 6.4" TFT LCD
monitor. I had to make it rotating (to switch between horizontal and
vertical games) because with a screen this small, every bit of screen
space counts (horizontal games displayed with a vertical setup are way
too small).
Storage
 For this MAME cabinet, I'm gonna use the same method I've used for my
previous one. Same CompactFlash-to-IDE adapter. But this one will only
use a 128MB CompactFlash card. After all, the C3 933MHz isn't powerful
enough to run recent games and old games are small. My guess is that
128MB will be plenty.
For this MAME cabinet, I'm gonna use the same method I've used for my
previous one. Same CompactFlash-to-IDE adapter. But this one will only
use a 128MB CompactFlash card. After all, the C3 933MHz isn't powerful
enough to run recent games and old games are small. My guess is that
128MB will be plenty.
Controls
 This cabinet is so small, I only had enough room on the control panel for
the joystick and four buttons. I still have no idea where I'm going to put
the GUI buttons… Probably under the control panel, just in front of
the cabinet. Then again I don't even think I got enough room there, unless
I use non-arcade buttons. And where do I put the coin and player 1 buttons?
So little space, so many buttons…
This cabinet is so small, I only had enough room on the control panel for
the joystick and four buttons. I still have no idea where I'm going to put
the GUI buttons… Probably under the control panel, just in front of
the cabinet. Then again I don't even think I got enough room there, unless
I use non-arcade buttons. And where do I put the coin and player 1 buttons?
So little space, so many buttons…
Sound
The M9000 is not Sound Blaster compatible (I'm using DOS, so I need hardware compatibility), so I had to use a PCI soundcard that was. However, something SB-compatible that fits inside the cabinet was almost impossible to find. I have about 2 mm clearance between the card's top and the inside of the cabinet. Yep, 2mm. That's not a typo.
Power
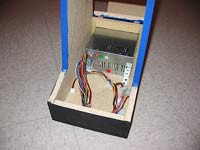 Turns out my cabinet is small, but not too small to use a regular ATX
power supply. It does take a lot of space inside though (I'd say about a
quarter of the space).
Turns out my cabinet is small, but not too small to use a regular ATX
power supply. It does take a lot of space inside though (I'd say about a
quarter of the space).
Marquee
 I currently have a small MAME marquee (the same graphic as my previous
cabinet) that was printed by a friend of mine on his HP LaserJet 2500.
The quality is simply incredible.
I currently have a small MAME marquee (the same graphic as my previous
cabinet) that was printed by a friend of mine on his HP LaserJet 2500.
The quality is simply incredible.
Marquee Neon
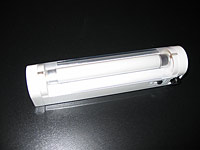 Yes, I found a 5" Neon. In fact it's the same brand/model as the one in
my previous cabinet, only smaller. This one is 6V though. I'll have to
try and run it on 5V, because I think a 12V-6V regulator would generate
too much heat. It should run on 5V with no problems though, as it can also
run on batteries and rechargeables are only 1.2V (instead of the usual
1.5V for AA's).
Yes, I found a 5" Neon. In fact it's the same brand/model as the one in
my previous cabinet, only smaller. This one is 6V though. I'll have to
try and run it on 5V, because I think a 12V-6V regulator would generate
too much heat. It should run on 5V with no problems though, as it can also
run on batteries and rechargeables are only 1.2V (instead of the usual
1.5V for AA's).
Cabinet
 This thing is so small, I really had to plan ahead this time. Even
then, I made a mistake about the motherboard location (would've made
the thing harder to access), which was corrected by a friend of mine at
work (same friend who printed the marquees). The answer was so obvious
I didn't see it at first (mount the motherboard directly to the back
panel). Anyway the cabinet is almost finished now except for the wiring
for the controls, the neon and the audio.
This thing is so small, I really had to plan ahead this time. Even
then, I made a mistake about the motherboard location (would've made
the thing harder to access), which was corrected by a friend of mine at
work (same friend who printed the marquees). The answer was so obvious
I didn't see it at first (mount the motherboard directly to the back
panel). Anyway the cabinet is almost finished now except for the wiring
for the controls, the neon and the audio.
Cost
This is a more or less complete list of all the stuff I had to buy to make Micro-MAME. This list will be updated as needed.
- Epia V10000: 180$ CAN (eBay)
- Sharp 6.4" LCD: 85$ CAN (eBay)
- PCI Soundcard: 15$ CAN (local computer store)
- CompactFlash to IDE adapter: 30$ CAN (eBay)
- 128MB CompactFlash card: 80$ CAN (Future Shop)
- Arcade joystick and four arcade buttons: 25$ CAN (eBay)
- ATX power supply: 40$ CAN (local computer store)
- Marquee: Free (Thanks André!)
- 5" Neon: 15$ CAN (Canadian Tire)
- Wood: 10$ CAN (Rona)
- Paint: 3$ CAN (local "one dollar store")
Total so far: 483$ CAN.

